Vizz 1.0
The control panel
Every section, button and setting in the control panel, from the status strip to the parameter list.
The control panel is where you build a look and set up the machine. Press Tab to show or hide it. It floats over the picture on the left of the window. Drag its title bar to move it and its corner to resize it.
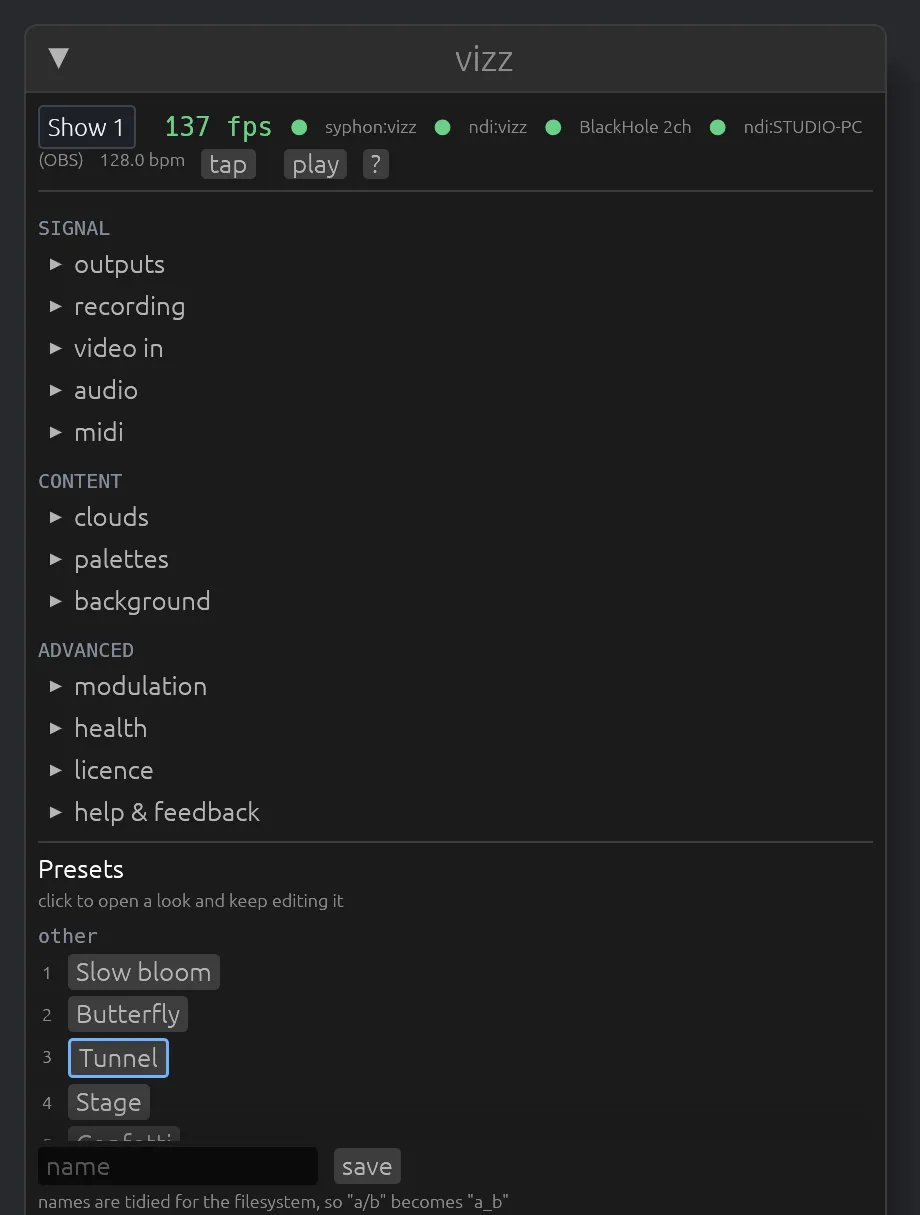
From top to bottom:
- An update banner and a licence banner, only when there's something to say.
- The status strip, which is always visible.
- Three groups of folding sections: SIGNAL (what comes in and goes out), CONTENT (what's drawn) and ADVANCED.
- Presets: your looks.
- Parameters: every control, grouped.
Everything is saved the moment it changes. There's no save button. The last line of the panel repeats the main keys: Tab panel · G canvas · P performance · ? shortcuts · Esc quits, twice.
Banners
Update banner
Shows vizz 1.0.1 available, for example, when a newer release is out. download, then install and restart, updates Vizz in place. what changed opens the release notes and later hides the banner until the next launch. The full story is in Updating.
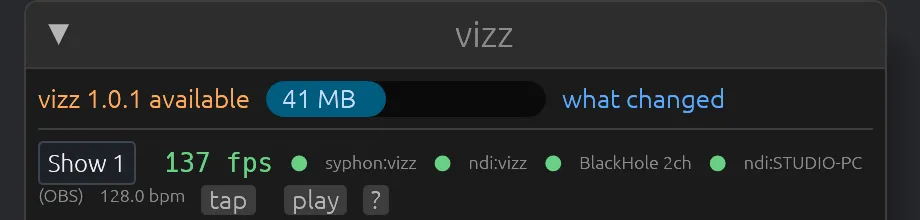
Licence banner
A line at the very top when the licence needs attention:
- nothing is being sent until a trial or a licence key is entered: this copy is locked. See Licence.
- Needs check-in · see licence, below or Updates ended … · see licence, below: nothing is restricted. It's a reminder.
Status strip
The one line to glance at during a set. It stays visible when every section is folded.

Show chip
The name of the open show. Click it for the show menu:
- OPEN: the list of shows on this machine. Click one to switch. Switching changes the pages, pads, looks, patches, fader layout and slider ranges all at once.
- new show…: an empty show, with no pages, no pads and none of your saved looks. The built-in looks are always there.
- save as…: copies this show under a new name and carries on in the copy. The show you were in is already saved.
- rename…
- delete this show: asks once (delete for good). It's hidden when there's only one show.
Under the name it says saved as you go. A show carries its own looks, so you can copy its folder to another machine. Your output size, audio device and MIDI map belong to the machine and don't change with the show.
Frame rate
Frames per second. Hover it for the average, the 95th percentile and how many frames went over budget. It turns amber when frames go over budget. More detail is in health.
Output dots
One dot per output, such as syphon:vizz or ndi:vizz. Green means it is sending, and amber means it isn't. If there are no outputs, the outputs section says none active — preview only.
Audio dot
The input device's name, with a green dot while audio arrives. The dot is amber when nothing is arriving, and the strip reads no audio when there is no input device.
Video dot
Only appears when a video input is set up. It shows the source's name.
Tempo
The current BPM.
tap
Tap the tempo. The button counts tap 1/3, tap 2/3. The third tap sets the tempo and turns auto off. The T key does the same.
play
Switches to the performance layout. Key: P.
?
Shows every keyboard shortcut. Key: ?.
Outputs
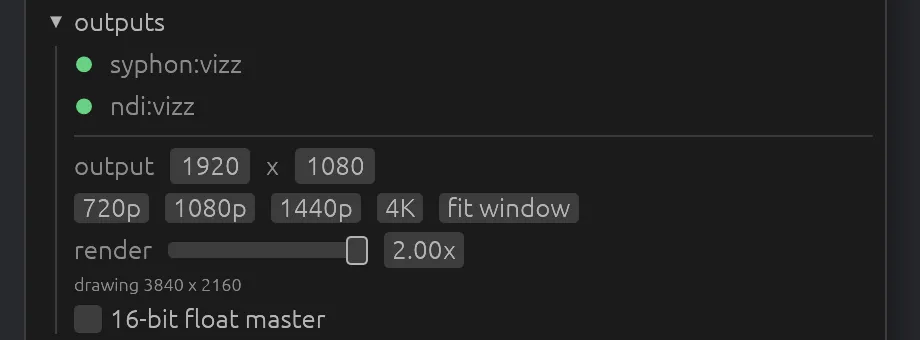
Under SIGNAL ▸ outputs. Where the picture goes, and how big it is.
Output list
Each output with its dot: syphon:vizz on a Mac, and ndi:vizz when Vizz was started with --ndi. Syphon, NDI and recordings all get this same picture at this size.
Output size
The width × height that receivers and recordings get, from 160 up to 8192 on the longest side. It's 1280×720 until you change it. The size is only applied when you let go of the drag. The window is just a preview, so resizing it never changes the output. Vizz remembers the size between launches. A --width or --height on the command line wins for that run.
If a recording is running, the section warns recording — changing the output stops it.
720p, 1080p, 1440p, 4K
Set the output to 1280×720, 1920×1080, 2560×1440 or 3840×2160.
fit window
Sets the output size to the window's current size.
render
How big the picture is drawn before being scaled to the output size. 0.25× to 2×. The line under it says drawing W x H. By default it's 2× for outputs up to 1080p and 1× above that. Drawing smaller is the cheapest way to hold the frame rate on a laptop. Drawing bigger smooths the particles.
16-bit float master
Gives the feedback and glow more headroom before they clip. Off by default. Syphon, NDI and recordings still get 8-bit, with one extra conversion step.
Recording
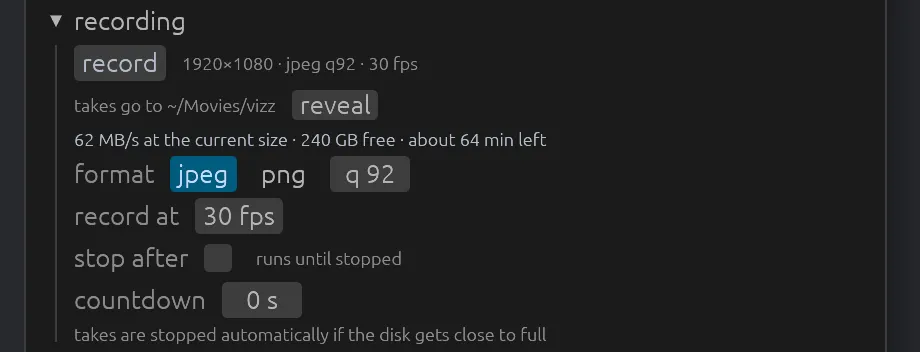
Under SIGNAL ▸ recording. Records the output to a folder of images. The whole workflow is in Record a take.
record
Starts a take. While it runs, it reads stop recording and shows m:ss · frames · dropped. The line beside it gives the size, format and rate, for example 1920×1080 · jpeg q92 · 30 fps.
reveal
takes go to … names the folder. On a Mac it's ~/Movies/vizz. reveal opens that folder.
Cost line
How many MB per second the current settings write, how much disk is free, and about how long that lasts. It turns amber under two minutes. Vizz stops a take on its own if the disk gets close to full.
format
jpeg (default) or png. JPEG has a quality control, q, from 40 to 100, default 92. PNG keeps the transparent background when background opacity is below 1. JPEG records it as black, and the section warns you.
record at
Frames per second written, 1 to 120. Default 30.
stop after
When ticked, a take stops itself after 1 to 3600 seconds (30 when you first tick it). Unticked, it runs until stopped.
countdown
Seconds to wait after pressing record, 0 to 30. Default 0. The performance layout's REC chip counts it down.
Video in
Under SIGNAL ▸ video in. Takes a picture from NDI, Syphon, or a camera or capture card, and turns it into a point cloud. Each particle takes one spot of the picture, its colour comes from the pixel, and its depth comes from the relief.
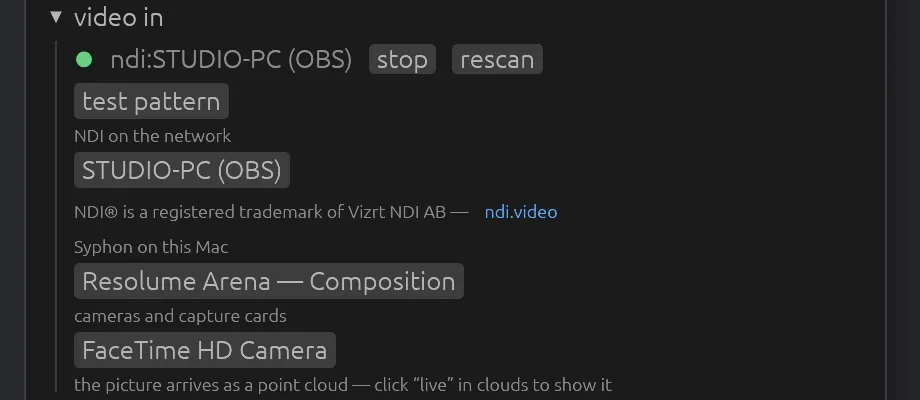
Source status
The connected source's name with a dot. It says no frames arriving if the source is connected but silent.
stop
Disconnects the video input.
rescan
Looks for senders, servers and cameras again. Use it after starting a sender.
test pattern
A moving pattern generated inside Vizz, sent through exactly the same path. If you can see the pattern but not your source, the problem is the source or the network, not Vizz.
Source lists
Click a name to receive from it:
- NDI on the network: NDI senders, such as OBS, another Vizz, or a camera app. Needs the NDI runtime.
- Syphon on this Mac: Syphon servers, such as Resolume.
- cameras and capture cards: on a Mac. macOS asks for camera permission the first time.
If nothing is listed, the section says nothing found — press rescan once a sender or camera is running.
The picture arrives as a cloud of its own. As the section says, click live in clouds to show it. A scene change can cross from it to a scan or an attractor like any other cloud.
Audio
Under SIGNAL ▸ audio. What Vizz listens to, and how it hears the beat. The guide Make it react to the music walks through setting it up.
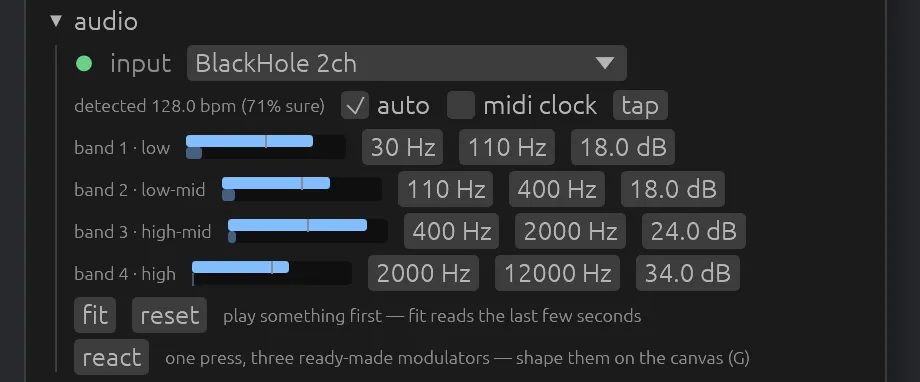
input
The audio device. system default is usually the built-in microphone, which hears the room rather than the mix. For the music itself, use an audio interface fed from the mixer, or a loopback device such as BlackHole carrying what the DJ software plays. The panel warns when the input is a microphone. The dot is green while audio arrives. It says not capturing when the device isn't delivering.
Detected tempo
detected 128.0 bpm (71% sure). Vizz listens for the beat between 60 and 200 BPM.
auto
When ticked, the detected tempo drives the beat clock, but only once it's reasonably sure. Tapping turns it off.
midi clock
When ticked, the beat clock follows MIDI clock from a connected device, and a MIDI Start resets the downbeat. It says no ticks while nothing arrives. Tapping, or ticking auto, switches back to Vizz's own clock.
tap
The same as the status strip's tap.
Band rows
Four bands: band 1 · low, band 2 · low-mid, band 3 · high-mid, band 4 · high. Each row has:
- A meter with two bars. The top bar is what modulation receives, and the bottom bar is what arrives at the input. The gap between them is the gain. A line marks the gate, and a red mark shows when the band is pinned at full.
- Low and high edges in Hz, from 20 Hz up to 20000 Hz. The defaults are 30–110, 110–400, 400–2000 and 2000–12000.
- Gain in dB, −24 to +54. The defaults are 18, 18, 24 and 34. They look high, but a band is only a few percent of full scale once the spectrum is split four ways.
fit
Sets every band's gain from the last few seconds of audio, so each one peaks just short of full. Play the music first. A silent band is left as you set it, and the button's message says so.
reset
Puts the bands and gains back to the shipped values. It asks once (reset?).
react
One press makes the picture follow the music with three ready-made modulators: the kick moves particle size, the loudness moves glow, and the snare moves brightness. It reads reacting while they're on. Press it again to remove them. You can shape them further on the modulation canvas.
MIDI
Under SIGNAL ▸ midi. Controllers connect by themselves. Plug one in during the set and it appears within a couple of seconds.

Devices
Each connected device is listed. no devices — plug one in, it connects automatically means none is connected. unavailable means MIDI couldn't start on this machine, and everything else still works.
Vizz recognises the Akai APC40 mkII and maps it for you:
- The top two rows of the clip grid are the 16 gravity pads, and rows 4 and 5 are the 16 scene pads.
- The eight track faders are particle size, speed, count, shape, morph, trail, glow and mirror.
- The master fader is the master.
- Stop All Clips is black, Tap Tempo taps, and the five Scene Launch buttons pick set-list pages 1 to 5.
The pads light up: dim orange for a pad that holds something, green for the one playing, and amber for where the autopilot goes next. A profile only fills controls you haven't mapped yourself, and never overrides your own learning. Hover the device's name to see that it was mapped for you.
Bindings
N bindings folds open to a list of every mapping: the control and what it drives, with unmap on each row. clear all forgets every binding. It asks once.
MIDI learn
Learning happens on the thing you want to control, not here. In the parameter list, hover a row and press learn, then move a knob or press a button. Pads, preset tiles, punch buttons and set-list chips have MIDI learn on their right-click menus. While a learn is armed, a banner says MIDI learn armed: the next knob or button you move or press binds to …. Click it to cancel. The section echoes whatever it hears, so a silent controller is easy to spot.
Control changes (including 14-bit pairs), notes and pitch bend can all be learned. A note acts while held, which suits the punch buttons.
Clouds
Under CONTENT ▸ clouds. The clouds the particles can take the shape of, and the ways to make new ones.
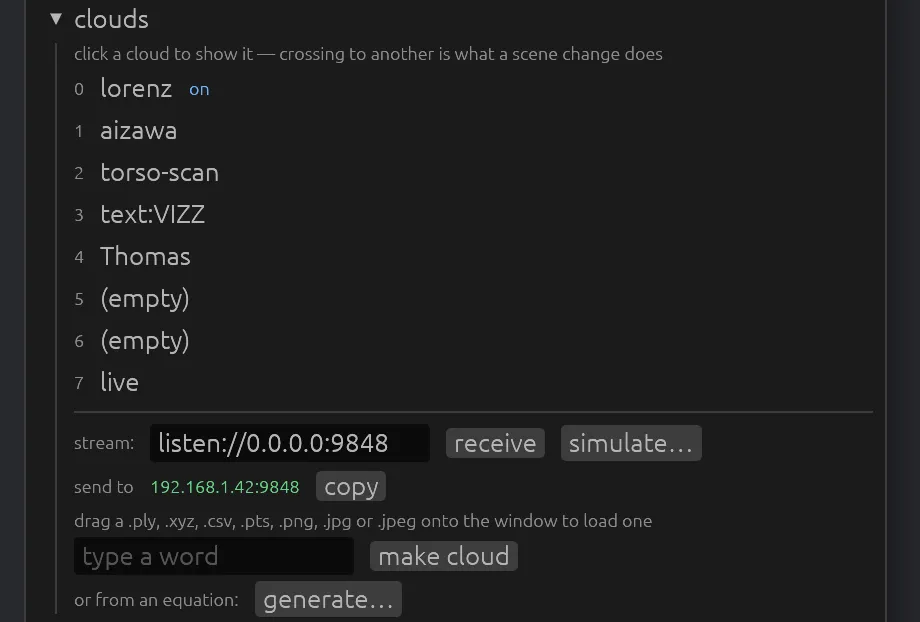
Cloud list
Every cloud slot, by name. Click one to show it. on marks the one on screen. The first two are the built-in Lorenz and Aizawa attractors. Then come the clouds you've loaded, then live for a stream or simulation, then video in. Crossing from one cloud to another is what a scene change does.
Drop a file
Drag a .ply, .xyz, .csv, .pts, .png, .jpg or .jpeg onto the window. It loads into the next slot and goes straight on screen.
- PLY can be ASCII or binary little-endian, with colour and normals if the file has them. A cloud with no colour takes the palette.
- XYZ, CSV and PTS are plain lists of points.
- Images become a coloured relief. Transparent pixels are left out, so a logo keeps its outline.
A file that won't read is a warning, never a crash. While you drag, a caption says whether Vizz can load the file.
type a word, make cloud
Type a word and press make cloud. The particles form it, in Vizz's own font. It comes back after a restart.
generate…
Makes a cloud from an equation: attractors, surfaces, knots, fractals, plants and patterns, grouped by kind. Picking one with settings opens a row of them, with make to build it, roll for a new random seed, and × to put the settings away. Every one is listed in Clouds, generators and simulations, and the guide is Make a cloud from an equation.
stream, receive
The address a live point-cloud stream comes from. The default, listen://0.0.0.0:9848, waits for a sender to connect to this machine. receive starts listening. You can also type tcp://host:port to connect out to a sender. Any app that writes PLY files one after another onto a socket works.
While listening, the section shows send to with this machine's address, for example 192.168.1.42:9848, and a copy button. That's the address to give the sender.
Stream status
While a stream runs, the row shows its state: the point count, or waiting — point the sender here. rescan listens again and stop ends the stream.
simulate…
Starts a simulation in the live slot, in place of whatever is there: a cloud that moves by itself, driven by the audio. A simulation with settings opens a row with run. The running one is remembered between launches. See Simulations.
Palettes
Under CONTENT ▸ palettes. The colour palettes palette chooses from.
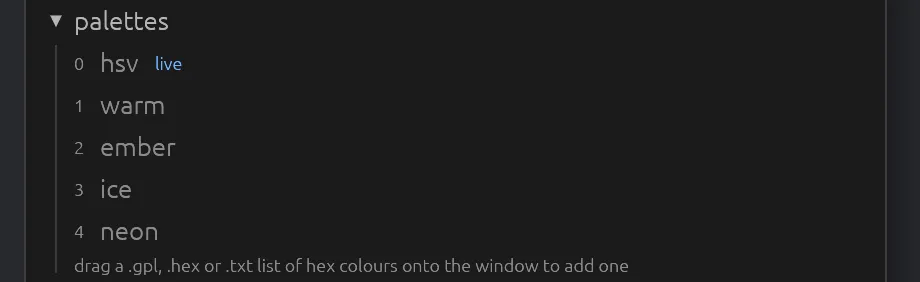
Palette list
The shipped palettes are hsv, warm, ember, ice and neon, then any you've added, each with its number. live marks the one in use. To change it, set the palette parameter to that number.
Add a palette
Drag a .gpl (GIMP palette), .hex or .txt list of hex colours onto the window. It's added to the end of the list, put in use straight away, and remembered. Drop the same file again after editing it and Vizz reloads it in place.
Background
Under CONTENT ▸ background.

colour
The background colour. Click the swatch to pick one. black sets it back to black.
opacity
0 to 1, default 1. The line under it explains what receivers get:
- opaque: a solid background.
- transparent — receivers get the field with an alpha channel: at 0, Syphon and NDI get only the particles, ready to layer in Resolume.
- partly transparent: somewhere in between.
- opaque — a vector layer is painting the whole frame: a vector layer covers the background whatever this says.
Modulation
Under ADVANCED ▸ modulation. The beat clock, the shared LFOs, and a list of every simple modulation route. For anything more than a route, use the modulation canvas.
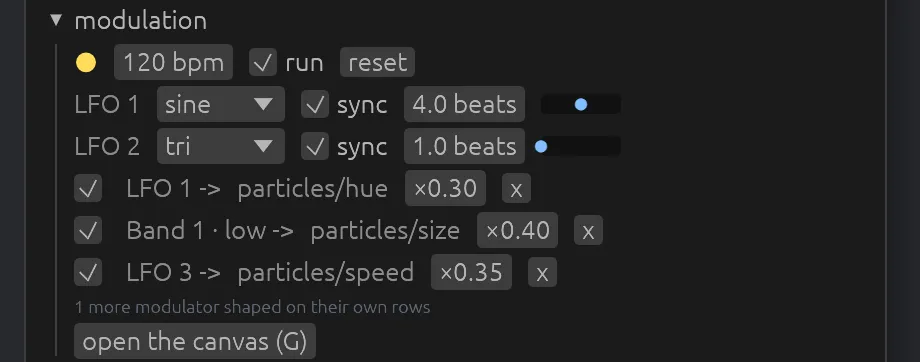
Beat clock
A light that flashes on the beat, the bpm (20 to 300), run to start and stop the clock, and reset to restart it on the downbeat.
Shared LFOs
LFO 1 and LFO 2, each with:
- a shape: sine, tri, saw, square or s&h
- sync: ticked, the rate is in beats per cycle (0.0625 to 32). Unticked, it's in Hz (0 to 20).
- a dot showing its output
Any parameter's modulator can use them.
Routes
One row per simple route: a tick to switch it on, source -> parameter, the depth (−1 to 1), and x to remove it. Modulators set up on a parameter's own row are counted underneath, as N more modulators shaped on their own rows. With nothing routed, it says no routes — press ~ next to a parameter, or wire nodes on the canvas.
open the canvas (G)
Opens the modulation canvas.
Health
Under ADVANCED ▸ health. How well Vizz is keeping up.
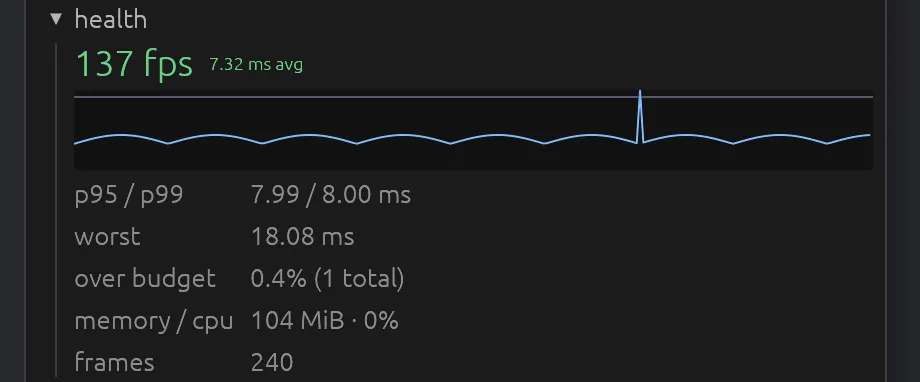
Frame rate and graph
The frame rate, the average frame time, and a graph of recent frame times with the 60 fps budget drawn as a line.
Numbers
p95 / p99 (the slow frames), worst, over budget (percentage and total), memory / cpu, and frames. If the average is high and p99 is close to it, every frame costs too much: lower the render scale or the particle count. If the average is fine but worst is huge, something is stalling from time to time.
Licence
The licence status, key and seat. With no licence and no trial, this section moves to the top of the panel as Licence and can't be folded. Otherwise it's under ADVANCED ▸ licence. See The trial and your licence key.
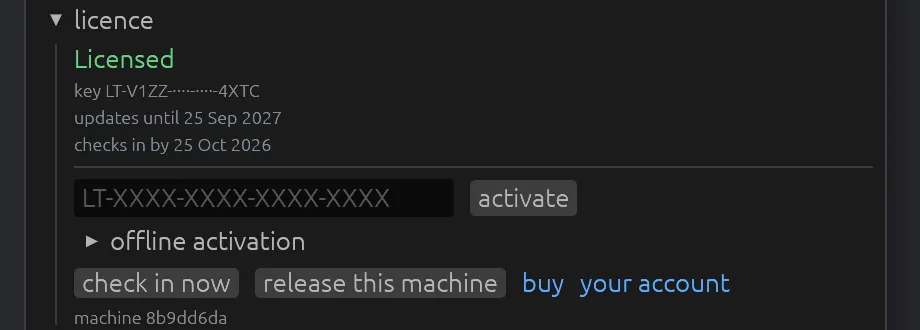
Status line
One of:
| It says | What it means |
|---|---|
| Licensed to … or Licensed | All good. |
| Trial, N days left | The trial is running. Everything works. |
| Needs check-in | It's been offline longer than its lease. Nothing is restricted. |
| Updates ended … | This version was released after your updates period. Nothing is restricted in 1.0. |
| Trial ended | Enter a key. |
| Licensed to another machine | Release it from your account, then activate here. |
| Unlicensed | No key or trial. |
Under it: the key, shown masked like LT-V1ZZ-····-····-4XTC, updates until … and checks in by ….
Key field and activate
Paste a key and press activate or Enter.
Start a trial
Only shown with no licence. Type your email (a name is optional) and press start 30-day trial. There's one trial per machine, and the key is emailed to you.
offline activation
For a machine that never goes online. Shows this machine's request code with copy, and a token field with use token. The steps are in Working offline.
check in now
Renews the licence lease now. Vizz also does this by itself about once a day.
release this machine
Gives this machine's seat back so the licence can be used somewhere else. Press it twice: the second press reads press again to release.
buy, your account
Links to the shop and to your account on letissier.ie. The last line shows this machine's short id.
Help and feedback
Under ADVANCED ▸ help & feedback.
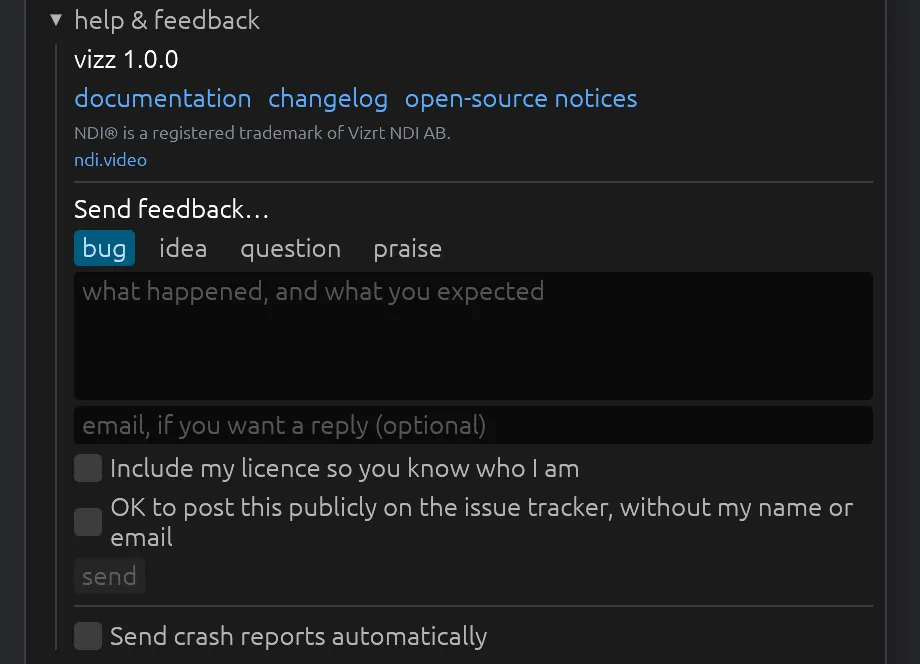
Version and links
The version, and links to the documentation, the changelog and the open-source notices, along with the NDI trademark notice.
Send feedback…
Send a bug, an idea, a question or praise to LeTissier Creative Studios. Write the message (up to 5000 characters) and, if you'd like a reply, your email. Two boxes, both unticked:
- Include my licence so you know who I am: only offered when a key is entered.
- OK to post this publicly on the issue tracker, without my name or email
With no network, the message waits and goes when there is one.
Send crash reports automatically
Off by default. After a crash, Vizz puts your show, the look that was playing and your outputs back, and then asks once: Send a crash report to LeTissier Creative Studios? You can add a note, tick Always send crash reports, or press Don't send.
A report holds the version, the operating system and the error's technical trace with your user name taken out. It never holds your shows, presets, sources, licence or email. Reports waiting to go are listed here with send and discard.
Presets
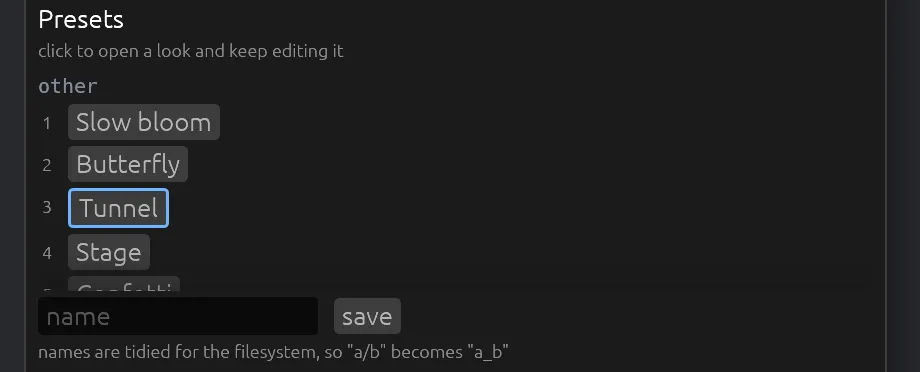
Your looks. A look is where every knob is sitting. Click one to load it and keep editing.
Preset list
Every look with its slot number, grouped by what it was built on. The built-in looks come first and can't be changed. Click a name to load it. It glides in rather than cutting. The look you loaded last is outlined, which answers where the look on screen came from. Hover a built-in for a line about it.
Recalling a look only changes the parameters that look sets. The master and the transport controls are never saved in a look.
Right-click a preset
- update picture: takes a new thumbnail for its tile from what's on the output now.
- rename…: your own looks only.
- MIDI learn / unmap: binds a button to recall this look.
x (delete)
Deletes one of your looks. Press it twice: it reads delete? the second time. Its picture goes with it.
Name field and save
Type a name and press save or Enter. If you last loaded one of your own looks, its name is offered. The button reads replace when the name is already used, and rename when that's what it will do. You can't save over a built-in name. Names are tidied for the filesystem, so a/b becomes a_b.
A picture is taken when you save, and the first time a look is fired.
The parameter list
Every parameter, grouped as the Parameters reference lists them.
filter
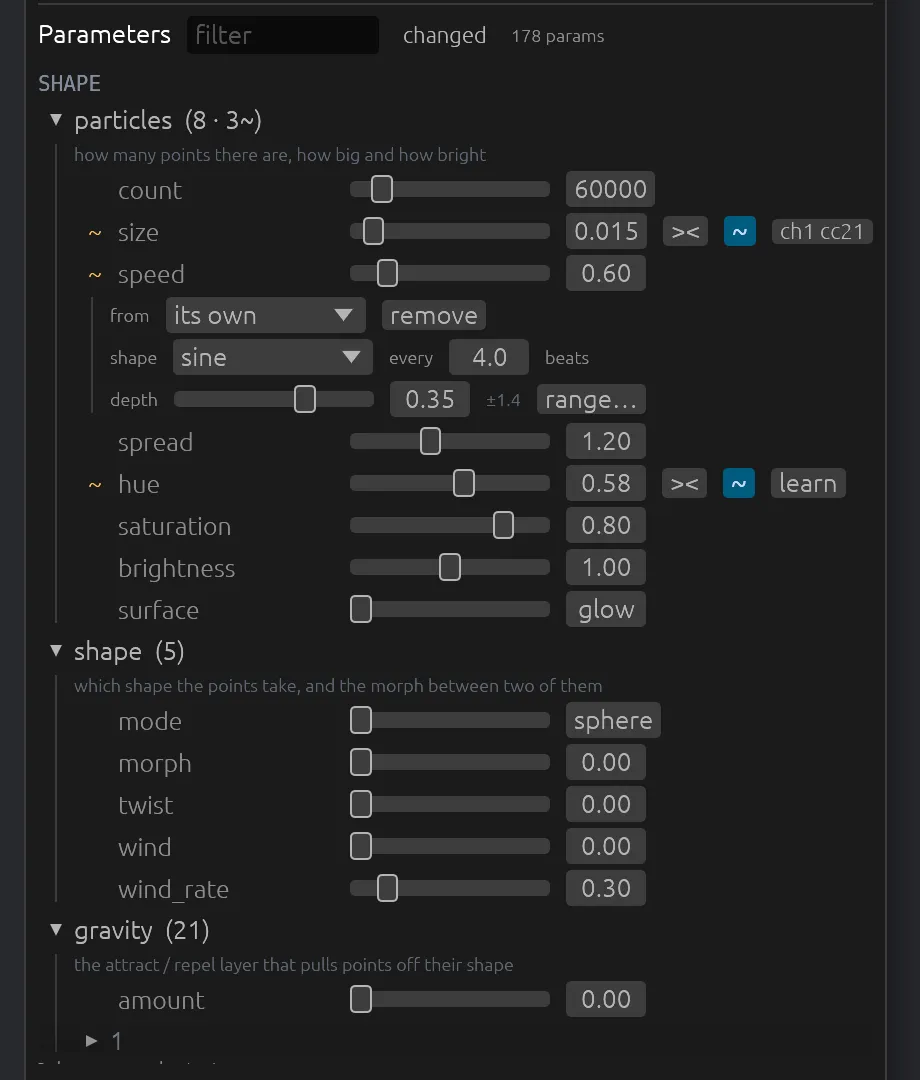
Type part of a name or address to narrow the list. The groups flatten while you type. Press / to jump here. x clears it.
changed
Shows only the parameters that are away from their default. It's the quickest way to see what a look actually does. The count beside it is the number of parameters shown.
Groups
Each group header shows how many controls it holds and, with ~, how many of them are moving by themselves right now, so a folded group still tells you. Repeated things such as gravity wells, lamps and vector layers open only when they're in use.
Slider
Drag to set, or type in the box. Stepped parameters show a name, like sphere or kaleido, instead of a number. Right-click puts the parameter back to its default.
Row marks
In the gutter on the left:
- ~: the parameter is being modulated. Hover it for the current offset. The value is still yours, and modulation adds on top.
- g: a global parameter that presets leave alone.
>< and <>
Appear when you hover a row. >< narrows the slider's working range around the current value, so a fader can sweep just the part you care about. <> widens it back. Ranges are saved with the show.
~ (modulate)
Appears when you hover a row. It opens the modulator editor for that parameter.
learn
Appears when you hover a row. Press it, then move a knob. The binding then shows in its place, for example ch1 cc21. Click the binding to remove it. It asks once.
Modulator editor

Opens under a row when you press ~:
- from: what moves it. its own is a private LFO for this row, and the other choices are the shared LFO 1 and LFO 2, Band 1–4 and Level. remove takes the modulator off.
- shape and every N beats (0.25 to 64): for its own LFO.
- depth, −1 to 1: how far it swings, shown in the parameter's own units beside it.
- range…: switches to setting the two ends of the swing directly. depth… switches back. In range mode, the slider no longer moves the parameter.