Vizz 1.0
Record a take
Record the output to a folder of images, check it will fit on the disk, and turn it into a video.
Vizz records the output as a numbered sequence of still images, one file per frame. A take survives a crash, because every finished frame is a finished file. There's no codec to choose, and one command turns the images into a video.
A recording is exactly what Syphon and NDI get: the output at the output size, not the window.
1. Set up the take
Open recording under SIGNAL in the control panel.
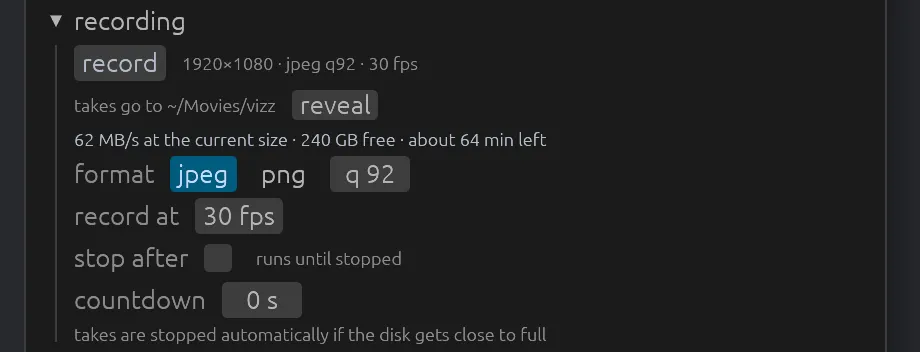
- format: jpeg is about a tenth the size of PNG and is right for almost everything. Use png when you need a transparent background for compositing.
- q: JPEG quality, 40 to 100. 92 is clean.
- record at: frames per second written. Halving it halves the disk use.
- stop after: tick it to end the take by itself after a set time.
- countdown: seconds between pressing record and the first frame, to get your hands on the controls.
Every setting is described in Recording.
2. Check the disk
The cost line says how fast the take will write, how much space is free, and about how long that lasts. It turns amber under two minutes. Lower the output size, the frame rate or the quality until it fits.
Vizz stops the take by itself if the disk gets nearly full, and keeps every frame written so far. If the disk can't keep up, Vizz drops frames from the recording rather than slowing the show, and counts them.
3. Record
Press record in the panel, or the REC chip on the performance layout. With a countdown set, the chip counts down first.
While it runs, the button reads stop recording and shows the time, the frames written and any dropped. On the performance layout, the REC chip turns red. Press either one again to stop.
You can also start and stop a take over OSC or MIDI with /record/active.
4. Find the take
Press reveal in the recording section to open the takes folder. It's ~/Movies/vizz on a Mac, and ~/Videos/vizz on Windows and Linux.
Each take has its own folder, named after the look you last recalled and the time in UTC, for example vizz-Butterfly-20260925-213004. Inside:
| File | What it is |
|---|---|
frame_000001.jpg, frame_000002.jpg, … | The frames. |
frames.csv | When each frame was taken, in milliseconds from the start. |
take.json | The look, size, rate and format of the take. |
5. Make a video
With ffmpeg installed, run this inside the take's folder:
ffmpeg -framerate 30 -i frame_%06d.jpg -pix_fmt yuv420p take.mp4
Use the rate you recorded at in place of 30, and .png for a PNG take.
To keep a transparent background from a PNG take, make a ProRes 4444 file instead:
ffmpeg -framerate 30 -i frame_%06d.png -c:v prores_ks -profile:v 4444 -pix_fmt yuva444p10le take.mov