Vizz 1.0
Make it react to the music
Feed Vizz the mix, set the four bands, lock the tempo, and make the picture move with the kick, the snare and the loudness.
Vizz listens to one audio input. It splits the sound into four bands, finds the beat, and lets any of those move any parameter. This guide goes from no sound to a picture that follows the music.
1. Feed it the mix
Open audio under SIGNAL in the control panel and pick an input.
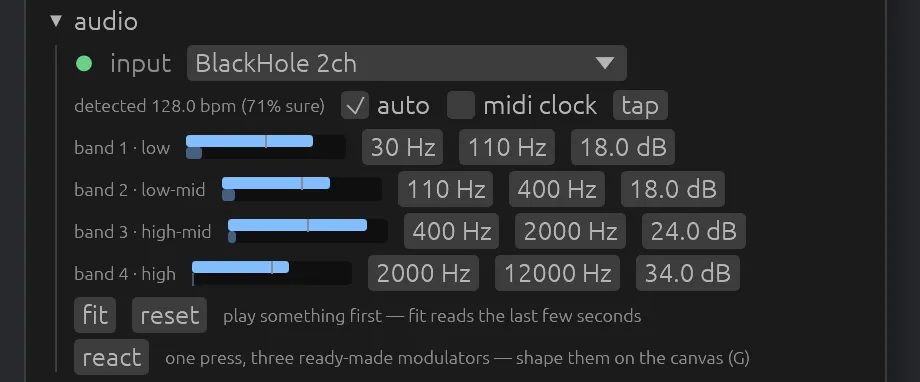
What to pick:
- At a gig: an audio interface input fed from a spare output on the mixer, such as a booth or record send.
- On one laptop with DJ software: a loopback device that carries what the software plays. On a Mac, BlackHole is free. On Windows, VB-Cable.
- Last resort: the built-in microphone. It hears the room, not the mix, and the panel says so.
On a Mac, the first time Vizz listens, macOS asks for microphone permission. That covers every audio input, not just the microphone. Allow it.
2. Read the meters
Each band has a meter with two bars. The bottom bar is the level arriving. The top bar is what the modulation gets, after the gain. A line marks the gate, and a red mark means the band is stuck at full.
| Band | Default range | Hears |
|---|---|---|
| band 1 · low | 30 to 110 Hz | The kick and the sub. |
| band 2 · low-mid | 110 to 400 Hz | Bass notes and the body of the snare. |
| band 3 · high-mid | 400 to 2000 Hz | Snare crack, vocals, leads. |
| band 4 · high | 2000 to 12000 Hz | Hats and cymbals. |
You can drag the edges of each band to suit the music.
3. Press fit
Play a loud part of a track and press fit. Vizz sets each band's gain from the last few seconds, so each one peaks just short of full. A band with nothing in it keeps its gain, and the message says which.
Gains are in dB, from −24 to +54. They look high because each band is only a small part of the full signal. reset goes back to the shipped bands and gains.
4. Lock the tempo
The beat drives LFOs, beat pulses, the scene autopilot and the strobe. Pick one way to set it:
- auto: Vizz follows the tempo it detects, between 60 and 200 BPM, once it's reasonably sure. The line above says detected 128.0 bpm (71% sure).
- midi clock: follow MIDI clock from your mixer or DJ software. A MIDI Start resets the downbeat.
- tap: tap T three times on the beat. Tapping switches auto off.
5. Press react
Press react. Three ready-made modulators go on at once:
- the kick moves particle size
- the loudness moves glow
- the snare moves brightness
The button reads reacting. Press it again to take them off. The same button is on the performance layout's audio strip.
6. Go further
A modulator on a fader
On the performance layout, click the number under any fader and choose Kick, Snare, Highs or Loudness. That fader's parameter now follows that part of the music. See Value: add a modulator.
A modulator on any parameter
In the parameter list, hover a row and press ~. Set from to Band 1 to Band 4 or Level, then set the depth. See Modulator editor.
Wire it on the canvas
Press G for the modulation canvas. An Audio band node through a Gate and an Envelope turns each kick into a clean pulse. Load the Pulse or Breathe patch to see how.
A cloud that dances
Most simulations are driven by the audio: the kick bursts the fluid, scatters the flock, or drops new grains on the sandpile.
If nothing moves
- The meters don't move: the input isn't getting sound. See No audio.
- The meters move but the picture doesn't: press react, or check the modulator depth isn't 0.
- Everything flickers at full: a band is stuck at full. Press fit during a loud part.