Vizz 1.0
The performance layout
The screen you play from. The punch buttons, layers, preset tiles, set list, gravity and scene pads, and faders, one by one.
The performance layout is the screen you play from during a set. Press P, or play on the control panel, to open it. Press P again, or edit, to go back.
The control panel is for building a look. This screen is for playing looks in an order. Its controls are large enough to hit without aiming, and it's high-contrast for a dark room.
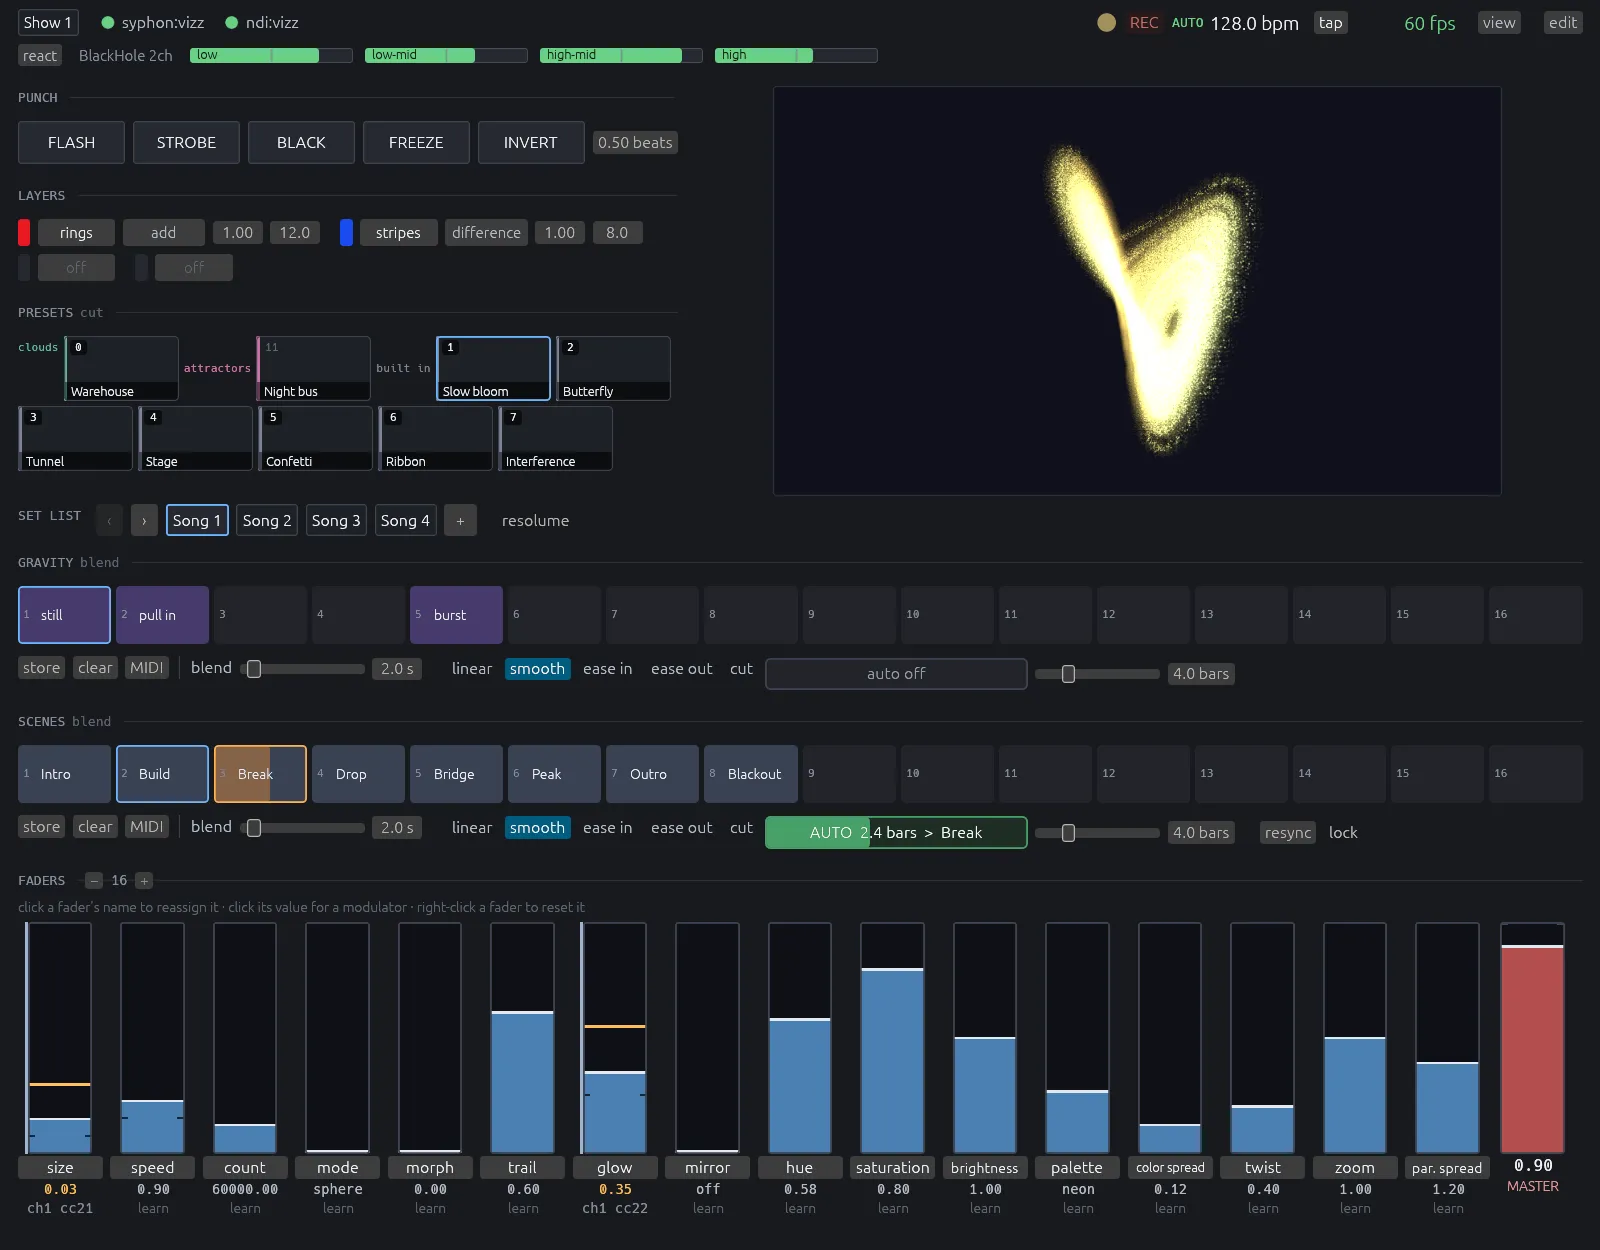
From top to bottom:
- The status strip and the audio strip.
- On the left, the punch buttons, the vector layers and the preset tiles. On the right, the output.
- The set list.
- The gravity pads and the scene pads, each with its own blend and autopilot.
- The faders and the master.
When the window is short, the rows stand down in order: first the layers and preset tiles, then the punch buttons. A line says so (taller window: punch, layers and preset tiles). The pads and faders always stay.
Status strip

Show chip
The open show. It's the same menu as on the control panel: see Show chip.
Output dots
A dot for each output that's sending. It says no outputs in amber when nothing is going out.
REC
Click to start recording the output. The chip turns red and shows the time and frame count while a take runs. Click it again to stop. If a countdown is set, it reads REC in 3… first, and a click cancels. The format and rate come from recording on the panel.
Tempo tag
Where the tempo comes from:
- AUTO: detected from the audio. It's amber when the detection isn't sure and the clock is coasting on its last tempo.
- MIDI: following MIDI clock. It's amber when no ticks are arriving.
- No tag: Vizz's own clock, set by tapping.
bpm and tap
The tempo, and a tap button. Three taps set the tempo and turn AUTO off. T does the same.
fps
The frame rate. It's amber when frames are over budget.
view
Clears the controls from the left-hand column so you can see the output bigger. The punch, layer and preset rows come back when you switch it off. Key: V.
edit
Goes back to the control panel. Key: P.
Audio strip
react
The same one-press switch as on the panel: the kick moves particle size, the loudness moves glow, and the snare moves brightness. It reads reacting while it's on. See react.
Input
The audio device's name. Click it to pick another. It says not capturing when the device isn't delivering.
Band meters
The four bands, low, low-mid, high-mid and high, as live meters, so you can see at a glance that the music is arriving. Set them up in audio.
Punch
Five buttons that act while you hold them. Let go and the picture comes straight back.

Shift-click latches a button on, and a plain click releases it. Every punch can be learned to a MIDI button from its right-click menu. A MIDI note acts while held, which is how they're meant to be played.
FLASH
Whites out the output. Space does the same, and Shift+Space latches it.
STROBE
Strobes in time with the beat. S on the keyboard.
Strobe rate
The box beside the buttons: beats per strobe cycle. Drag it to change it. See /punch/strobe_div.
BLACK
Blacks out the output. B on the keyboard.
FREEZE
Holds the picture where it is. F on the keyboard.
INVERT
Inverts the picture. I on the keyboard.
Layers
The vector layers: flat shapes drawn over the point field, such as rings, stripes and stars. Each row is one layer. Every setting is in Vector layers.

Colour mark
The swatch at the start of the row shows the layer's ink colour.
Generator
The shape the layer draws. Click to step through them, or right-click to choose from the list. An empty layer reads off.
Blend mode
How the layer mixes with what's under it: normal, multiply, screen, add, difference, exclusion or subtract. Click to step, right-click to choose.
Opacity and frequency
The two numbers: how strong the layer is (0 to 1), and how many repeats it draws. Drag to change them.
+ a layer
With no layer on, the row offers + buttons to start one. Right-click its name afterwards to choose the generator.
Preset tiles
Your looks, as tiles with a picture of each. Click a tile to recall the look. The header says cut because a tile changes the look straight away, unlike a scene pad, which blends.
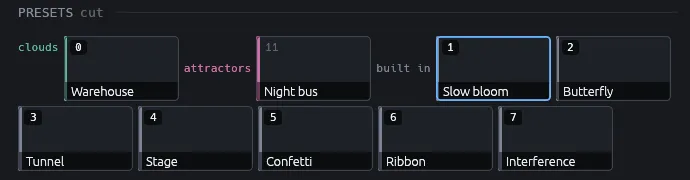
The tiles are grouped and tinted by what each look was built on: clouds, shapes, attractors, the built-in set and so on. The number on each tile is its slot. The number keys 1 to 9 and 0 fire slots 1 to 10. The look you recalled last is outlined.
Drag a tile onto a pad
Drag a tile onto a scene pad to put that look there.
Right-click a tile
- update picture: takes a new picture for the tile from what's on the output now.
- rename…: renames the look. Pads that use it follow.
- put on a scene pad: a list of the 16 pads, showing what each holds now.
- MIDI learn / unmap: binds a controller button to recall this look.
Output
The live output, the same picture Syphon, NDI and recordings get, letterboxed to the output's shape.
Set list
One page of pads per song. Each page has its own gravity and scene pads. The chips are the pages. Click one to switch.

‹ and ›
The previous and next page. Over OSC: /deck/prev and /deck/next.
Page chips
Click a chip to switch to that page. Right-click one for:
- rename…: give the page a name and, optionally, the song.
- duplicate: a copy of the page, to make a variation.
- resolume columns from N: the Resolume column this page starts at. See Follow Resolume's columns.
- MIDI learn / unmap: a controller button that selects this page.
- delete page: asks once (delete for good). The pads go. The looks they name stay.
+
Adds a new, empty page. Right-click it for load the built-in set: twenty songs, each with eight pads (Intro, Build, Break, Drop, Bridge, Peak, Outro, Blackout). It replaces every page you have, so it asks once. The looks your pages name stay.
resolume
When on, Vizz follows Resolume: launching a column in Resolume fires the matching pads here, and selecting a deck picks the matching page. See Follow Resolume's columns.
Gravity
A row of 16 pads for the attract and repel layer. Each pad holds a pull: where the gravity wells sit and how strong they are. Firing a pad moves the wells there over the blend time.

The row stays hidden until you capture your first pull. Until then it offers capture gravity into pad 1. Shape the wells in the panel's gravity group first (see Gravity).
The gravity row has the same buttons as the scene row, described next. It runs its own autopilot, and its lock can tie it to the scenes.
Scenes
A row of 16 pads. Each pad holds a look. Firing a pad blends from what's on screen to that look over the blend time, using the curve you pick. The guide is Build a set with scenes.

Settings that step, such as the shape, switch at the halfway point of a blend. A cloud is never blended point by point. The shape morphs to it instead.
Pad
Click to fire. A filled pad shows the look's name. The one playing is lit, and the one blending in fills as it goes.
- Alt-click fires the whole column: this scene pad and the gravity pad with the same number, together.
- Double-click renames the pad.
- Drop a preset tile on it to assign that look.
Right-click a pad
- assign preset…: choose a look from the list.
- capture current look: saves what's on screen as a new look and puts it on this pad.
- re-capture in place: replaces this pad's look with what's on screen, on every pad and page that plays it. Asks once.
- rename
- clear: arms the pad. Press it to empty it.
- store blank: a scene that takes everything to zero, for an ending.
- MIDI learn / unmap: a controller button that fires this pad.
store
Arm it, then press a pad to capture the current look into it. If that look is also on other pads, the pad gets a new copy and the others keep theirs. Shift-click re-captures it on all of them.
clear
Arm it, then press a pad to empty it. Pressing anything else keeps it.
MIDI
Arm it, then press a pad, then press the controller button that should fire it.
blend
How long a change takes, 0 to 30 seconds. 0 is a cut. Over OSC it goes up to 60 (see /scene/time).
Curve
The shape of the blend: linear, smooth (the default), ease in, ease out or cut.
auto
The autopilot. When on, it walks the filled pads in order, in time with the beat clock. The button reads AUTO 2.4 bars > Break: how long until the next step and where it goes. auto off means it's stopped. Click to switch it on or off.
bars
How often the autopilot steps, 0.25 to 16 bars.
resync
Only on the scene row. Puts both autopilots back on their first pad, on the same step.
lock
Only on the scene row. Keeps the gravity autopilot on the scene autopilot's rate and curve, so the two can't drift apart.
Faders
Large faders for the parameters you play most. There are 16 to start with. Use − and + beside the FADERS header for 4 to 24. The fader layout is saved with the show.
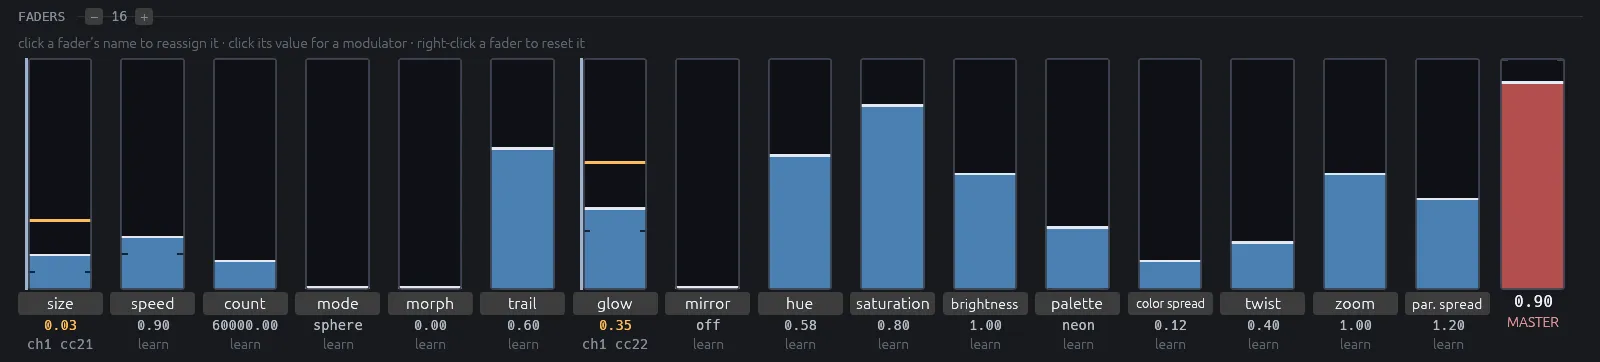
As the line above them says: click a fader's name to reassign it · click its value for a modulator · right-click a fader to reset it.
Fader
Drag to set. The bar is the value you set. When something is modulating the parameter, a second, thinner mark shows where it's actually been pushed. A stepped parameter such as the shape reads a name (sphere) rather than a number. Right-click puts it back to its default.
Name: reassign
Click a fader's name to choose what it controls. The list is grouped by area and has a filter: type part of a name to narrow it. Choose — none — to leave the fader empty.
Value: add a modulator
Click the number under a fader to give it a ready-made modulator, with no wiring:
| Name | What it does |
|---|---|
| Slow sweep | A sine over eight beats. |
| Bar sweep | A sine over four beats, one bar. |
| Beat pulse | A snap on every beat. |
| Bar pulse | The same snap, once a bar. |
| Rise | Ramps up over four beats, then drops. |
| Fall | Full on the downbeat, empty by the next. |
| Steps | A four-beat ramp in four steps. |
| Kick | The low band as a snap. |
| Snare | The high-mid band as a snap. |
| Highs | The top band, smoothed. |
| Loudness | The overall level. |
| Wobble | Four cycles a second, not tied to the beat. |
| Random step | A new value every beat. |
| Flicker | Random, twelve times a second. |
— none — takes it off. Each one is built on the modulation canvas, so you can open it there and change it. A fader moved by something built on the canvas says modulated from the canvas.
learn
The line under each fader. Click it, then move a knob or fader on your controller. The binding shows in its place, for example ch1 cc21. Click the binding to clear it.
Master
The red fader at the end. It dims everything on the output, and at the bottom it reads BLACK. A preset or a scene never moves it. Right-click resets it to full. See /master/dim.