Light 1.0
Getting started
From the demo show to your own fixtures lighting up, in numbered steps.
This walkthrough starts where Installing ends: LIGHT is open on the demo show. Allow about half an hour, less if you already know your rig's DMX addresses.
1. Play with the demo
LIGHT opens on a demo show called Electronic Set. It has twenty songs, a rig of derbies, partybars, pixel strips and a hazer, and 190 looks. Nothing is sent to a real rig: LIGHT always starts offline.
The first time, a card called This is LIGHT offers three ways on:
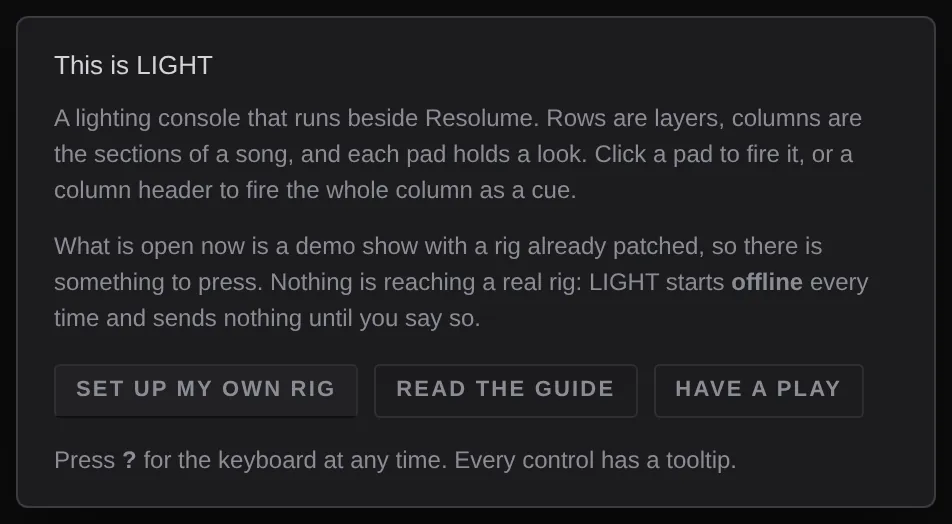
- Have a play closes the card and leaves you on the demo. Start here.
- Set up my own rig asks for a name, makes a new empty show, and opens the Rig view. That is step 3 below.
- Read the guide opens the LIGHT user guide in your browser.
The card appears only once. With the demo open:
- Press ⌥1 for the Pads view.
- Press 4 to fire column 4, Drop. Every pad in that column fires, and the stage view at the top lights up.
- Click a single pad to fire just that pad. Click the ✕ on a layer's head to stop that layer.
- Tap T four times in time with some music to set the tempo. Every effect follows.
- Press ] to go to the next song, [ to go back.
- Press B for blackout, and B again to bring the show back.
Nothing you do here reaches a rig, and the demo is only a show file. Change anything you like. Keyboard shortcuts lists every key.
2. Make a show of your own
- Click the show name at the left of the top bar (Electronic Set ▾).
- Choose + new project…, type a name, and press Enter.
A new show has four empty layers, eight columns (Intro to Blackout) in one song, and two DMX universes, both switched off. The demo stays in the list, so you can go back to it at any time.
The setup steps strip appears under the top bar on a show with no fixtures. It ticks off Output, Fixtures, Stage and Groups by reading your show, and adds Aim if you patch moving heads. Take me there jumps to the next step. You can follow it instead of the steps below.

3. Tell LIGHT where the DMX goes
- Open the settings with the cog at the right of the status line (or ⌘,). The sheet is titled Setup and opens on Output.
- In the Universes table, set each universe's Art-Net universe (or sACN universe) to the number your node is set to. Then switch Art-Net or sACN on for it.
- Leave Send to on everyone unless your node needs unicast. In that case, type the node's IP address.
See Settings ▸ Output for every column.
4. Patch your fixtures
- Press ⌥3 for the Rig view.
- Click + add fixture…, pick the fixture type, how many, the universe and the first address, and add them. If you have a GDTF file for the fixture, or an MVR from your lighting plan, use import instead.
- Check the Addr column against the addresses set on the fixtures themselves.
- Hold the find button (the magnifier) on a row. That fixture goes to full white on the real rig, so you can see which one it is.
The patching guide covers GDTF, MVR, re-addressing and multi-head fixtures.
5. Place them and group them
- On the plan to the right of the fixture table, drag each fixture to where it hangs. The stage view draws them there, and spread effects run across them in that order.
- Open Groups in the Rig view's left rail and press auto-groups. LIGHT makes one group per fixture type and one per truss. You can make your own too: select fixtures and press ⊕ group from N.
Looks are built on groups, so you can't program anything until at least one group exists.
6. Build your first look
- Press ⌥4 for the Build view.
- Click an empty pad, then + create look here. The new look lights its first group at full.
- Pick a colour on the Colour tab.
- Press + effect for a dimmer wave, or browse… to pick one from the catalogue.
- Name it in the field at the top of the editor.
Looks and Effects explain every control in the editor.
7. Go live
- Press offline in the top bar. It turns into live and DMX starts flowing. The output lamp in the status line reads sending ·N.
- Fire your pad. Your fixtures should do what the stage view shows.
If nothing lights, see Troubleshooting.
Next
- Let Resolume fire your columns: Follow Resolume.
- Put the pads on a controller: Map a MIDI controller.
- Hand a tablet to the drummer: Run it from a tablet or phone.